Types of Mold Testing: Part 4 – Wall Cavity Testing

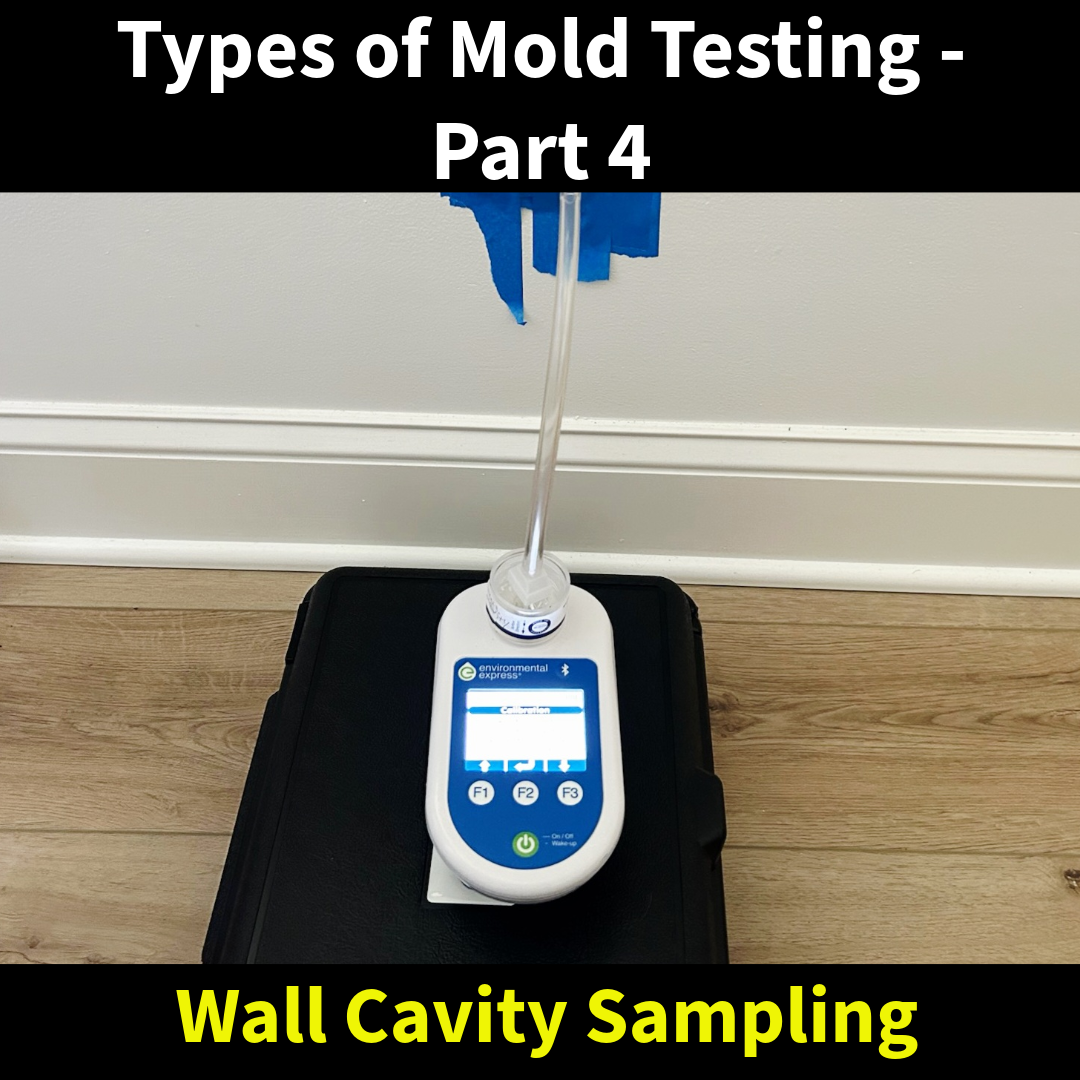
Not all mold problems grow in plain sight. Some of the most damaging infestations hide inside walls, under floors, or behind cabinets. These hidden areas stay damp long after a leak or flood, creating perfect conditions for mold growth. That’s why inspectors often use inner-wall cavity testing to confirm whether mold is present where you can’t see it.

How Cavity Testing Works

  • A trained inspector drills a small, discreet hole into the wall or ceiling near the suspected area.
  • A sterile tube or cassette is inserted to pull an air sample from inside the cavity.
  • The sample is sent to a certified laboratory, where spore counts are compared to baseline indoor and outdoor levels.

This process gives a direct look at what’s happening behind the surface — without having to tear down entire sections of drywall.

When It’s Used

  • Insurance Claim Disputes: Homeowners are often told “no visible damage, no problem.” Cavity testing can prove hidden mold exists and help validate claims.
  • Follow-Up to Positive Tests: If a surface or air sample in the room already showed elevated spores, cavity testing helps confirm whether mold is also thriving behind the walls.
  • Suspected Leaks: When there’s a history of plumbing issues, roof leaks, or water intrusion but no obvious staining, cavity testing can identify hidden moisture damage.
  • Mystery Odors: A persistent musty smell is often the first clue that mold is active behind finished surfaces.

Why It Matters

Mold hidden inside walls can spread unchecked for months, making remediation more invasive and expensive. By detecting the problem early, inner-wall cavity testing provides homeowners with clear answers — and the documentation they need when dealing with insurance companies, landlords, or contractors.

Protect Your Property with Expert Mold Testing

If you suspect hidden mold in your home or business, don’t wait for the damage to spread. At MSI, we use industry-standard testing methods, including cavity sampling, to uncover mold where it hides and provide you with a clear plan for remediation.

Types of Mold Testing: Part 3 — Bulk Sampling Explained

When it comes to mold testing, there isn’t a one-size-fits-all method. In our earlier posts, we covered air sampling and surface sampling, both of which are useful for detecting airborne spores and identifying mold growth on visible surfaces. But what if the concern runs deeper — inside the actual building materials? That’s where bulk sampling comes in.

What Is Bulk Sampling?

Bulk sampling involves physically removing a portion of a material suspected of mold contamination — such as a piece of drywall, insulation, wood, or carpet — and sending it to a laboratory for analysis. Unlike air testing, which measures spores in the environment, or surface testing, which captures mold directly from a wall or countertop, bulk sampling provides direct evidence of what’s inside the material itself.

How the Process Works

  1. Selection of the Sample Area – A certified inspector identifies the material most likely to show contamination. This might be drywall around a window leak, flooring in a basement, or insulation inside a wall cavity.
  2. Careful Removal – A small section of the material is cut out using sterile tools. It must be handled carefully to avoid cross-contamination.
  3. Sealed for Transport – The sample is placed in a sterile container or bag and labeled with the exact location it came from.
  4. Laboratory Analysis – At the lab, technicians examine the material under a microscope and may perform cultures to identify the exact type of mold and the extent of colonization.
  5. Report & Interpretation – The results are compared against industry standards and presented in a clear report that homeowners, insurance adjusters, or even courts can understand.

Why Bulk Sampling Matters

Bulk sampling is not always necessary, but when it is, it can be the deciding factor in serious cases:

  • Insurance & Legal Disputes – A homeowner claiming hidden water damage or a tenant alleging unsafe living conditions often needs indisputable proof. A piece of mold-infested drywall carries far more weight than air readings alone.
  • Remediation Decisions – Sometimes materials can be cleaned and salvaged. Other times, replacement is unavoidable. Bulk sampling helps make that call with certainty.
  • Health & Safety – If mold is inside porous materials, it can continue spreading even if the surface looks clean. This test reveals contamination most people can’t see.

A Real-World Scenario

Consider a homeowner who notices a musty odor in their finished basement but sees no visible mold. Air samples show elevated spore counts, but the insurance company questions the source. During inspection, we identify staining on a small section of drywall near the baseboard. A bulk sample is collected and sent to the lab, which confirms active mold growth within the gypsum core. This undeniable evidence proves the presence of hidden contamination, helping the homeowner secure coverage for full remediation.

Pros & Cons of Bulk Sampling

Pros:

  • Conclusive, physical evidence of contamination.
  • Strong documentation for lawsuits, insurance claims, and disclosure cases.
  • Guides clear remediation decisions.

Cons:

  • Destructive — requires cutting into building materials.
  • Limited to the exact spot tested, meaning other areas may still need further investigation.
  • More time-intensive than surface swabs.

Final Thoughts

Bulk sampling may not be needed for every project, but when legal, insurance, or health questions arise, it can be the most powerful tool in mold testing. With over 27 years of experience, MSI has performed thousands of tests and has been called upon as an expert witness in countless disputes. Our team knows when bulk sampling is the right step — and how to use it to give homeowners the clarity they need.

Types of Mold Tests – Part 1: Air Sampling Explained

When it comes to mold, what you see is only part of the story. Mold spores are microscopic and can be floating through the air even when surfaces look clean. That’s where air sampling comes in — a testing method designed to find out what you can’t see and help determine if indoor air quality has been compromised.


What Is Air Sampling?

Air sampling measures the concentration and types of mold spores in the air at a given time. This is done by pulling air through a specialized cassette that traps particles onto a slide. The sample is then sent to a certified laboratory, where it’s analyzed under a microscope to identify mold types and spore counts.


How It’s Done

  • Step 1 – Site Selection: We select sampling points based on the home’s size and layout, taking into account the total square footage and number of floors. At least one outdoor sample is collected for comparison.
  • Step 2 – Air Collection: Using a calibrated pump, we pull a controlled volume of air for generally around 5 minutes through a spore trap cassette.
  • Step 3 – Lab Submission: The sealed cassettes are sent to an accredited laboratory for analysis.
  • Step 4 – Reporting: Results are compiled into a detailed report showing spore counts, types present, and how they compare to outdoor levels.

Pros of Air Sampling

  • Detects hidden mold growth that may not be visible.
  • Helps assess indoor air quality concerns.
  • Provides a lab-certified baseline before and after remediation.
  • Quick and non-destructive.

Cons of Air Sampling

  • Represents only a “snapshot in time” — spore levels can fluctuate based on activity and conditions.
  • May not pinpoint the exact source of hidden mold without additional inspection.
  • Only collects aerosolized mold spores — if mold isn’t actively airborne during testing, it may not be detected.

Results & Turnaround Time

Most air sampling results are available within three business days, though expedited testing is possible if needed. The report will list spore counts by type, compare them to outdoor samples, and note whether elevated levels are present indoors.


Cost Expectations

For a typical two-story home of 1,600–2,000 square feet, a standard air sampling test often ranges from $450 to $750.
If you choose a comprehensive test — sampling every room in the home — costs can range from $950 to $1,350 for the same size property. Larger homes, or those with multiple HVAC zones, will cost more due to the number of samples needed.


The Bottom Line

Air sampling is one of the most effective ways to assess what you can’t see — airborne mold spores. Whether you’re concerned about your health, verifying a remediation job, or buying a home, it’s a valuable tool in determining if your indoor air is truly clean.

MSI has been providing professional mold testing since 1998, with over two decades of experience interpreting results and guiding property owners toward the right solutions.